SVN Setting

SVN Setting

참조 : http://playgroundblog.tistory.com/86

SVN 설치여부

# svnserve —version

SVN REPOSITORY 추가생성

#svnadmin create —fs-type fsfs PROJECTNAME

#chmod -R g+ws PROJECTNAME

# cd PROJECTNAME/conf

#vi svnserve.conf

anon-access = none

auth-access = write

password-db = passed

authz-db = author

vi passwd

[users]

userid = passw0rd

vi author

[/]

userid = rw

SVN 설정

# vi /etc/sysconfig/svnserve

OPTIONS=“—threads —root /svn”

SVN 서비스 기동

#service svnserve start

SVN 서비스포트 : 3690

방화벽이나 potable 등에서 수정을 통해 외부 포트 오픈 해줘야 함.

#vi /etc/sysconfig/iptables (CentOS6)

#vi /etc/firewalld/zones/public.xml

<port protocol=“tcp” port=“3690” /> //추가

</zone>

#firewall-cmd —reload

# svn checkout file:///svn/PROJECTNAME /home/DIRECTORY

자동으로홈디렉토리업데이트및소유자권한으로변경

#cd PORJECTNAME/hooks

#vi post-commit

#!/bin/sh

export LANG=en_US.UTF-8

svn update /home/DIRECTORY

chown -R OWNER:GROUP /home/DIRECTORY

#chmod 777 post-commit

Who Am I – Casting Crowns

Who Am I – Casting Crowns

Who am I, that the Lord of all the earth
내가 누구이길래, 세상의 전부이신 주께서

Would care to know my name
내 이름을 알려고 하시고

Would care to feel my hurt
나의 상처에 함께 아파하시나요

Who am I, that the Bright and Morning Star
내가 누구길래, 저 빛나는 새벽별도

Would choose to light the way for my ever wandering heart
나의 상한 마음에 빛을 비추시나요

Not because of who I am
내가 누구이기 때문이 아니라

But because of what You’ve done
당신이 하신 일 때문이죠

Not because of what I’ve done
내가 무엇을 해서가 아닌

But because of who You’re
바로 당신이기 때문이죠


I am a flower quickly fading
나는 빨리 시드는 꽃과도 같아서

Here today and gone tomorrow
오늘 여기 있다가 내일은 가버릴 수도 있어요

A wave tossed in the ocean
바다 위에 울렁대는 파도와 같고

A vapor in the wind
바람에 흩어지는 안개와 같아요

Still You hear me when I’m calling
하지만 당신은 나의 부르짖음에 귀 기울이시고

Lord, You catch me when I’m falling
주님은 내가 실패할 때 나를 붙드시죠

And You’ve told me who I am
그리고 내가 누구인지 말씀해주셨죠

I am Yours, I am Yours
나는 당신의 것 입니다. 나는 당신의 것입니다.

Who Am I, that the eyes that see my sin
제가 누구길래, 나의 죄를 살펴보셔야 할 당신이

Would look on me with love and watch me rise again
사랑으로 나를 바라보시고 제가 다시 일어서기를 지켜봐주시나요

Who Am I, that the voice that calmed the sea
내가 누구길래, 바다조차 잠잠케 하는 당신의 목소리로

Would call out through the rain and calm the storm in me
빗속의 나를 부르시며 내 안의 폭풍을 잠잠케 하시나요


I am Yours
나는 당신 것입니다

Whom shall I fear
제가 누구를 두려워하겠습니까?

Whom shall I fear ‘Cause I am Yours
나는 당신 것인데, 두려워할 게 무엇입니까?

I am Yours
나는 당신 것입니다


윈도우에서 Apache + PHP + Oracle 연동하기

1. HTTP 설치

http://www.apachelounge.com/download/

32/64비트에 맞춰서 다운로드하고

위 페이지 중간 쯤에 있는 Visual Studio 관련 링크 화일을 다운로드 및 설치 합니다.

https://www.microsoft.com/en-us/download/details.aspx?id=49984

Visual Studio 관련화일은 다운로드 받아서 실행하면 그대로 윈도우에 설치가 되며,

아파치 화일은 다운로드 후 압축을 풀어 적당한 위치에 옮겨둡니다.

저는 C:\Apache24 로 지정하였습니다.

고급설정 환경변수에서 시스템 환경변수 중 PATH 에 C:\Apache24\bin 을 추가해주고,

커맨드 창에서

– 서비스 등록

> httpd -k install

– 서비스 실행

> httpd -k start

한 후 브라우저에서 localhost 라고 치면 홈페이지가 나오는 것을 확인하실 수 있습니다.

참고로

– 서비스 종료

> httpd -k stop

– 서비스 제거

> httpd -k uninstall

2. PHP 설치

http://windows.php.net/download/

Thread 버전 다운받기

마찬가지로 다운로드 받은 화일 압축을 풀어준 후 적당한 곳에 옮겨둡니다.

저는 여러 폴더 만들기가 귀찮아서

C:\Apache24\php56

이라고 만들어 옮겨 두었습니다.

php 폴더 내에 있는 php.ini-production 화일을 php.ini로 바꿔서 Windows 폴더에 옮겨 줍니다.

이 후 아래 부분들을 수정해 줍니다.

display_errors = On

extension_dir = “C:\Apache24\php56\ext”

date.timezone = Asia/Seoul

extension=php_oci8_12c.dll  ; Use with Oracle Database 12c Instant Client

또한 httpd.conf 도 수정합니다.

LoadModule php5_module “c:/Apache24/php56/php5apache2_4.dll”
AddHandler application/x-httpd-php .php

# configure the path to php.ini
PHPIniDir “C:/Windows”

<FilesMatch \.php$>
SetHandler application/x-httpd-php
</FilesMatch>

이 후 아파치 재시작해서 php가 제대로 작동하는지 확인 바랍니다.

3. Oracle InstantClient

http://www.oracle.com/technetwork/database/features/instant-client/index-097480.html

오라클 instant Client basic 과 SQL*Plus 화일을 다운로드 받아서 압축을 푼 후

같은 폴더에 몰아 둡니다.

역시 귀찮은 관계로 C:\Apache24\instantclient_12_1 이라는 곳에 몰아 넣었습니다.

그 다음으로 여기 폴더에 있는 화일 중 “o”로 시작하는 dll 화일들을 저는 귀찮아서 모두를

C:\Apache24\bin 폴더에 몰아 넣습니다.

이 후 고급설정 환경변수에서 시스템 환경변수 중

PATH 에 C:\Apache24\instantclient_12_1

ORACLE_HOME 에 C:\Apache24\instantclient_12_1

TNS_ADMIN 에 C:\Apache24\instantclient_12_1

을 추가해주고,

커맨드 창에서

> sqlplus user/pass@192.168.1.2/orcl

로 접속이 되는지 확인합니다.

물론 위와 같은 오라클 서버가 잘 돌아가고 있다는 전제하에서 입니다.

접속이 된다면…..

4. 설정 잡기

아파치를 재시작해보고

phpinfo(); 를 해서 OCI8 이 나오는지 확인 해보고

여기서 안 나오면 대략 난감.. (저도 이 부분에서 만 하루를 헤맸습니다.)

5. 테스트해보기

<?php

$conn = oci_connect(“USER”, “PASS”, "192.168.1.2:1521/orcl");

if (!$conn) {

$m = oci_error();

echo $m['message'], "\n";

exit;

}

else {

echo "Connected to Oracle!";

}

/* multi rows */

$query = "SELECT COLUMN1,COLUMN2 FROM TABLENAME”;

$stid = oci_parse($conn, $query);

oci_execute($stid);

while (($row = oci_fetch_array($stid, OCI_BOTH))) {

echo $row[0] . " : " . $row[1] . "<br>";

}

echo "Total Count : " . oci_num_rows($stid);

oci_free_statement($stid);

oci_close($conn);

?>

잘 나온다면 성공한 겁니다. 축하합니다. ㅠㅠ

[라즈베리파이] 웹을 통한 GPIO 제어

목표 : 라즈베리파이를 이용한 웹을 통한 GPIO제어를 하려한다.

1. 라즈베리파이의 웹서비스 제공.

$sudo apt-get install lighttpd

lighttpd 서비스 설치.

$sudo lighttpd start

하고서 라즈베리파이의 IP를 브라우저에서 보면

스크린샷 2015-08-13 오후 12.03.40

lighttpd 화면을 볼 수 있다.


2. 설정변경.

pi@raspberrypi /var/www $ ls -l /usr/bin/python
lrwxrwxrwx 1 root root 9 Jun 6 2012 /usr/bin/python -> python2.7

pi@raspberrypi /var/www $ sudo chmod u+s /usr/bin/python

pi@raspberrypi /var/www $ ls -l /usr/bin/python
-rwsr-xr-x 1 root root 2674528 Mar 17 18:16 /usr/bin/python
python의 실행권한을 변경하고,
$ sudo vi /etc/lighttpd/lighttpd.conf
server.modules = (
“mod_access”,
“mod_alias”,
“mod_accesslog”,
“mod_auth”,
“mod_ssi”,
“mod_cgi”,
“mod_compress”,
“mod_fastcgi”,
“mod_rewrite”,
)
server.modules 에 상기와 같이 변경해주고,
제일 하단에 python 화일을 넣어둘 디렉토리를 지정해준다.
$HTTP[“url”] =~ “^/py/” {
cgi.assign = ( “.py” => “/usr/bin/python” )
}
이후
$ sudo service lighttpd restart
재시작을 하고
test.py 를 /var/www/py 폴더 내에 입력해준다.
#! /usr/bin/python
# bring in the libraries
import RPi.GPIO as G
from flup.server.fcgi import WSGIServer
import sys, urlparse

# set up our GPIO pins
G.setmode(G.BOARD)
G.setup(7, G.OUT)
G.setup(11, G.OUT)
G.setup(13, G.OUT)

# all of our code now lives within the app() function which is called for each http request we receive
def app(environ, start_response):
# start our http response
start_response(“200 OK”, [(“Content-Type”, “text/html”)])
# look for inputs on the URL
i = urlparse.parse_qs(environ[“QUERY_STRING”])
yield (‘&nbsp;’) # flup expects a string to be returned from this function
# if there’s a url variable named ‘q’
if “q” in i:
if i[“q”][0] == “a”:
G.output(7, True)   # Turn it on
elif i[“q”][0] == “b”:
G.output(7, False)  # Turn it off
elif i[“q”][0] == “c”:
G.output(11, True)  # Turn it off
elif i[“q”][0] == “d”:
G.output(11, False)  # Turn it off
elif i[“q”][0] == “e”:
G.output(13, True)  # Turn it off
elif i[“q”][0] == “f”:
G.output(13, False)  # Turn it off

#by default, Flup works out how to bind to the web server for us, so just call it with our app() function and let it get on with it
WSGIServer(app).run()

$ chmod +x test.py
python 파일의 실행권한 변경.
/var/www/test.html 입력 내용.
<html>
<head>
<title>Hello from the Pi</title>
<script src=”//ajax.googleapis.com/ajax/libs/prototype/1.7.1.0/prototype.js”></script>
</head>
<body>
<h1>Hello world from the Raspberry Pi</h1>
<form>
<input type=”button” value=”1On” onclick=”go(‘a’)” style=”font-size:200%;”><br />
<input type=”button” value=”1Off” onclick=”go(‘b’)” style=”font-size:200%;”>
<br /><br />
<input type=”button” value=”2On” onclick=”go(‘c’)” style=”font-size:200%;”><br />
<input type=”button” value=”2Off” onclick=”go(‘d’)” style=”font-size:200%;”>
<br /><br />
<input type=”button” value=”3On” onclick=”go(‘e’)” style=”font-size:200%;”><br />
<input type=”button” value=”3Off” onclick=”go(‘f’)” style=”font-size:200%;”>
</form>
<script type=”text/javascript”>
function go(qry) {
new Ajax.Request(‘./py/test.py?q=’ + qry,
{method: ‘GET’}
);
}
</script>
</body>
</html>
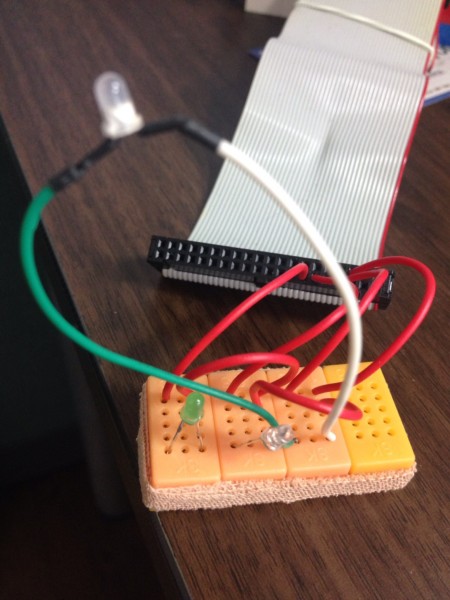
GPIO 작업부분은 아래와 같이 7, 11, 13 번에 각각의 LED + 선을 연결하고, GND 선을 연결해준 후…
photo_1439435724
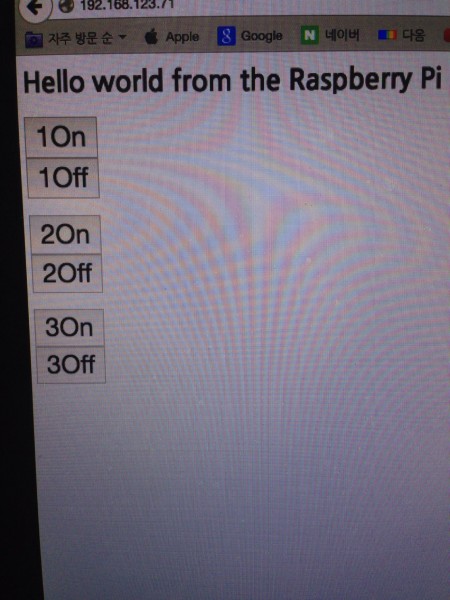
홈페이지 를 열어보시면… 아래와 같은 화면이 보인다.
 photo_1439435723
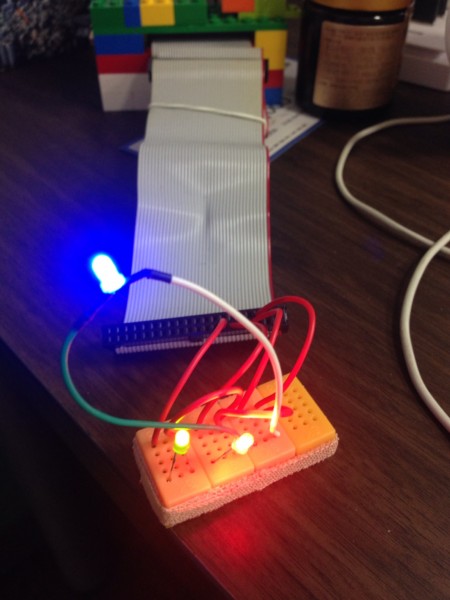
각각의 ON 을 누르면 아래와 같이 3개의 LED가 들어오는 것을 볼 수 있다.
photo_1439435722
참고 : http://make.bcde.jp/category/16/

apns 사용을 위한 인증서 생성하기.

apns 사용을 위한 인증서 생성하기.

aps_cert.p12 인증서 파일을 생성 키체인의 보내기를 통해 발급 후

Mac OS X의 터미널에서 아래 명령을 입력하여 ~~.pem 키 파일을 생성한다.

Enter Import Password가 나오면 방금 설정한 aps_cert.p12 인증서의 암호를 입력한다.

$ openssl pkcs12 -in aps_cert.p12 -out aps_private.pem -nodes -clcerts
Enter Import Password:
MAC verified OK

필요한 aps_private.pem 파일 생성이 완료된다.


from http://pyrasis.com/book/TheArtOfAmazonWebServices/Chapter26/04/03

How to send email from command line?

1. telnet abc.com(useful mail server) 25

2. helo xyz.com(your domain)

3. mail from:your@email.domain

4. rcpt to:destination@email.address

5. data

6. Type your message

7. .(type a period and hit enter)

That’s all!

숙제가 안풀린다~

아아아~~~ 미치겠당…

ssh tunneling 을 통한 mysql 연동을 해야하는데

암흑 속을 헤메이는 듯한 느낌이다…

답을 찾아야 할텐데…

1. mysql 연결 ok

2. ssh 연결 ok

3. tunneling 요게 문제임… 천천히 둘러가더라도 답을 찾아보자…

에구구~~~

mysqldump 한글 깨짐..

mysqldump 시 한글 깨지는 현상 방지를 위한 덤프방법.

#mysqldump --default-character-set=latin1 -u[아이디] -p [디비명] > [저장하고자하는 화일명].sql

매번 쓰면서도 잊어버려서 기록..

swipe library – SWTableViewCell

SWTableViewCell
===============

An easy-to-use UITableViewCell subclass that implements a swipeable content view which exposes utility buttons (similar to iOS 7 Mail Application)

##Functionality
###Right Utility Buttons
Utility buttons that become visible on the right side of the Table View Cell when the user swipes left. This behavior is similar to that seen in the iOS apps Mail and Reminders.

###Left Utility Buttons
Utility buttons that become visible on the left side of the Table View Cell when the user swipes right.

###Features
* Dynamic utility button scalling. As you add more buttons to a cell, the other buttons on that side get smaller to make room
* Smart selection: The cell will pick up touch events and either scroll the cell back to center or fire the delegate method `- (void)tableView:(UITableView *)tableView didSelectRowAtIndexPath:(NSIndexPath *)indexPath`

So the cell will not be considered selected when the user touches the cell while utility buttons are visible, instead the cell will slide back into place (same as iOS 7 Mail App functionality)
* Create utilty buttons with either a title or an icon along with a RGB color
* Tested on iOS 6.1 and above, including iOS 7

##Usage

###Standard Table View Cells

In your `tableView:cellForRowAtIndexPath:` method you set up the SWTableView cell and add an arbitrary amount of utility buttons to it using the included `NSMutableArray+SWUtilityButtons` category.

- (UITableViewCell *)tableView:(UITableView *)tableView cellForRowAtIndexPath:(NSIndexPath *)indexPath {
static NSString *cellIdentifier = @"Cell";

SWTableViewCell *cell = (SWTableViewCell *)[tableView dequeueReusableCellWithIdentifier:cellIdentifier];

if (cell == nil) {
NSMutableArray *leftUtilityButtons = [NSMutableArray new];
NSMutableArray *rightUtilityButtons = [NSMutableArray new];

[leftUtilityButtons sw_addUtilityButtonWithColor:
[UIColor colorWithRed:0.07 green:0.75f blue:0.16f alpha:1.0]
icon:[UIImage imageNamed:@"check.png"]];
[leftUtilityButtons sw_addUtilityButtonWithColor:
[UIColor colorWithRed:1.0f green:1.0f blue:0.35f alpha:1.0]
icon:[UIImage imageNamed:@"clock.png"]];
[leftUtilityButtons sw_addUtilityButtonWithColor:
[UIColor colorWithRed:1.0f green:0.231f blue:0.188f alpha:1.0]
icon:[UIImage imageNamed:@"cross.png"]];
[leftUtilityButtons sw_addUtilityButtonWithColor:
[UIColor colorWithRed:0.55f green:0.27f blue:0.07f alpha:1.0]
icon:[UIImage imageNamed:@"list.png"]];

[rightUtilityButtons sw_addUtilityButtonWithColor:
[UIColor colorWithRed:0.78f green:0.78f blue:0.8f alpha:1.0]
title:@"More"];
[rightUtilityButtons sw_addUtilityButtonWithColor:
[UIColor colorWithRed:1.0f green:0.231f blue:0.188 alpha:1.0f]
title:@"Delete"];

cell = [[SWTableViewCell alloc] initWithStyle:UITableViewCellStyleSubtitle
reuseIdentifier:cellIdentifier
containingTableView:_tableView // For row height and selection
leftUtilityButtons:leftUtilityButtons
rightUtilityButtons:rightUtilityButtons];
cell.delegate = self;
}

NSDate *dateObject = _testArray[indexPath.row];
cell.textLabel.text = [dateObject description];
cell.detailTextLabel.text = @"Some detail text";

return cell;
}

###Custom Table View Cells

Thanks to [Matt Bowman](https://github.com/MattCBowman) you can now create custom table view cells using Interface Builder that have the capabilities of an SWTableViewCell

The first step is to design your cell either in a standalone nib or inside of a
table view using prototype cells. Make sure to set the custom class on the
cell in interface builder to the subclass you made for it:

Then set the cell reuse identifier:

When writing your custom table view cell’s code, make sure your cell is a
subclass of SWTableViewCell:

#import

@interface MyCustomTableViewCell : SWTableViewCell

@property (weak, nonatomic) UILabel *customLabel;
@property (weak, nonatomic) UIImageView *customImageView;

@end

If you are using a separate nib and not a prototype cell, you’ll need to be sure to register the nib in your table view:

- (void)viewDidLoad
{
[super viewDidLoad];

[self.tableView registerNib:[UINib nibWithNibName:@"MyCustomTableViewCellNibFileName" bundle:nil] forCellReuseIdentifier:@"MyCustomCell"];
}

Then, in the `tableView:cellForRowAtIndexPath:` method of your `UITableViewDelegate` (usually your view controller), initialize your custom cell:

- (UITableViewCell*)tableView:(UITableView*)tableView cellForRowAtIndexPath:(NSIndexPath*)indexPath
{
static NSString *cellIdentifier = @"MyCustomCell";

MyCustomTableViewCell *cell = (MyCustomTableViewCell *)[tableView dequeueReusableCellWithIdentifier:cellIdentifier
forIndexPath:indexPath];
__weak MyCustomTableViewCell *weakCell = cell;
//Do any fixed setup here (will be executed once unless force is set to YES)
[cell setAppearanceWithBlock:^{
weakCell.containingTableView = tableView;

NSMutableArray *leftUtilityButtons = [NSMutableArray new];
NSMutableArray *rightUtilityButtons = [NSMutableArray new];

[leftUtilityButtons sw_addUtilityButtonWithColor:
[UIColor colorWithRed:0.07 green:0.75f blue:0.16f alpha:1.0]
icon:[UIImage imageNamed:@"check.png"]];
[leftUtilityButtons sw_addUtilityButtonWithColor:
[UIColor colorWithRed:1.0f green:1.0f blue:0.35f alpha:1.0]
icon:[UIImage imageNamed:@"clock.png"]];
[leftUtilityButtons sw_addUtilityButtonWithColor:
[UIColor colorWithRed:1.0f green:0.231f blue:0.188f alpha:1.0]
icon:[UIImage imageNamed:@"cross.png"]];
[leftUtilityButtons sw_addUtilityButtonWithColor:
[UIColor colorWithRed:0.55f green:0.27f blue:0.07f alpha:1.0]
icon:[UIImage imageNamed:@"list.png"]];

[rightUtilityButtons sw_addUtilityButtonWithColor:
[UIColor colorWithRed:0.78f green:0.78f blue:0.8f alpha:1.0]
title:@"More"];
[rightUtilityButtons sw_addUtilityButtonWithColor:
[UIColor colorWithRed:1.0f green:0.231f blue:0.188 alpha:1.0f]
title:@"Delete"];

weakCell.leftUtilityButtons = leftUtilityButtons;
weakCell.rightUtilityButtons = rightUtilityButtons;

weakCell.delegate = self;
} force:NO];

cell.customLabel.text = @"Some Text";
cell.customImageView.image = [UIImage imageNamed:@"MyAwesomeTableCellImage"];
[cell setCellHeight:cell.frame.size.height];
return cell;
}

###Delegate

The delegate `SWTableViewCellDelegate` is used by the developer to find out which button was pressed. There are two methods:

- (void)swipeableTableViewCell:(SWTableViewCell *)cell didTriggerLeftUtilityButtonWithIndex:(NSInteger)index;
- (void)swipeableTableViewCell:(SWTableViewCell *)cell didTriggerRightUtilityButtonWithIndex:(NSInteger)index;

The index signifies which utility button the user pressed, for each side the button indices are ordered from right to left 0…n

####Example

#pragma mark - SWTableViewDelegate

- (void)swipeableTableViewCell:(SWTableViewCell *)cell didTriggerLeftUtilityButtonWithIndex:(NSInteger)index {
switch (index) {
case 0:
NSLog(@"check button was pressed");
break;
case 1:
NSLog(@"clock button was pressed");
break;
case 2:
NSLog(@"cross button was pressed");
break;
case 3:
NSLog(@"list button was pressed");
default:
break;
}
}

- (void)swipeableTableViewCell:(SWTableViewCell *)cell didTriggerRightUtilityButtonWithIndex:(NSInteger)index {
switch (index) {
case 0:
NSLog(@"More button was pressed");
break;
case 1:
{
// Delete button was pressed
NSIndexPath *cellIndexPath = [self.tableView indexPathForCell:cell];

[_testArray removeObjectAtIndex:cellIndexPath.row];
[self.tableView deleteRowsAtIndexPaths:@[cellIndexPath]
withRowAnimation:UITableViewRowAnimationAutomatic];
break;
}
default:
break;
}
}

(This is all code from the included example project)

###Gotchas

#### Custom `UITableViewCell` content
* Accessing view of the cell object or managing the predefined content still works fine. So for example if you change the cell’s `imageView` or `backgroundView`, `SWTableViewCell` will still work as expected
* Don’t use accessory views in your cell, because they live above the `contentView` and will stay in place when the cell scrolls.

#### Seperator Insets
* If you have left utility button on iOS 7, I recommend changing your Table View’s seperatorInset so the seperator stretches the length of the screen

 tableView.separatorInset = UIEdgeInsetsMake(0, 0, 0, 0);

##Contributing
Use [Github issues](https://github.com/cewendel/SWTableViewCell/issues) to track bugs and feature requests.

I’m really busy in college and not actively working on this, so pull requests would be greatly appreciated.

##Contact

https://github.com/cewendel/SWTableViewCell/

Chris Wendel

– http://twitter.com/CEWendel

## Licence

MIT